As baby grows throughout their first year of life, their immune system is growing, too. Being exposed to germs in the home throughout their first year is part of how baby’s immune system develops and strengthens. That means you don’t have to stress about the mess in your home – it’s making your kid stronger!
Why Sterilize Baby Bottles?
There is a difference between immune-building bacteria and bad bacteria. Often, disease-causing germs are found on items that come into contact with baby’s mouth, like baby bottles. Washing bottles in hot, soapy water is key, but some harmful bacteria can linger through even the lengthiest scrubbing – and arrive after washing.
See, bacteria can cultivate through transfer, including handling bottle nipples with unwashed hands. Also from exposure, such as leaving a washed bottle on the kitchen counter when you prepped that raw chicken last night.
That’s why many parents choose to add sterilizing to your bottle cleaning process. By sterilizing, harmful bacteria is eliminated.
How Often Should I Sterilize?
The Centers for Disease Control states that, “Sanitizing is particularly important when your baby is younger than three months, was born prematurely, or has a weakened immune system.” In those cases, sterilizing at least one daily is recommended. For older, healthy babies, it may not be necessary as long as those items are carefully cleaned after each use.
Ask your pediatrician regarding how often to sterilize for healthy, older babies, but these are our general recommendations:
- Sterilize before the first use of the bottle after purchase.
- Sterilize after traveling with the bottle.
- Sterilize if milk or formula has been inside at room temperature beyond the recommended time period.
- Sterilize if it comes in contact with contaminated surfaces or floors.
- Sterilize daily when baby is sick with the flu or other viral or bacterial infections.
It’s important to note that excessive sterilization over time may cause the ink on some Dr. Brown’s bottles to come off. The same can be said about rough scrubbing of the exterior of the bottle vessel.
At Dr. Brown’s®, we like options – so let’s look at a few ways to sterilize your Dr. Brown’s bottles quickly and effectively no matter where you’re at when it’s feeding time.
How to Sterilize Baby Bottles on the Stovetop
You just need a clean pot (or saucepan depending on bottle count), water, and a stove burner.
The plus side to stovetop sterilizing is you already have all the mechanisms. The con is that it’s the most time-consuming way to sterilize. Here are the steps:
- Remove all internal parts from the bottles and place everything into a pot.
- Fill the pot with enough water to cover all bottle parts to make sure the bottles don’t touch an exposed area of the pot.
- Bring the pot of water to a boil and boil for at least five minutes.
- Turn off the stove and let everything cool before removing.
- Let bottles and parts air dry.
Take care with what you use to air dry bottles. Allowing them to touch the surface of the counter can contaminate the bottles. Instead, grab Dr. Brown’s Folding Drying rack. It’s designed to fit not just bottles and accessories but typical cups, bowls, and utensils. The drying rack features a raised drying platform, so you can eliminate bottle contact. The tray base collects water so your countertop doesn’t. When you’re done, fold the rack back up and store in a clean, dry place.

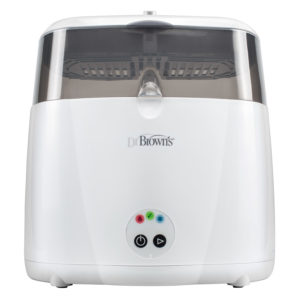
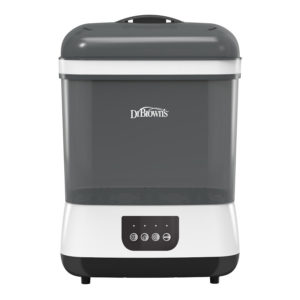
The Convenience of Electric Steam Sterilizers
If you prefer convenience and ease of use, go with an electric steam sterilizer. They use steamed water that reaches high temperatures to kill bacteria. They quickly sterilize, easily clean bottles, nipples, bottle parts, and pacifiers, and leave nothing behind. If you don’t have a dishwasher, we highly recommend the electric steam sterilizer. The only downside: They take up space.
Dr. Brown’s® Deluxe Bottle Sterilizer, has some other benefits, too. It fits all Dr. Brown’s bottles and most other bottle brands, it cleans up to 6 bottles at once, features an auto shut-off, and has an upper basket designed for a multitude of nipples, pacifiers, and internal bottle parts. Here’s how to use it:
- Remove the internal bottle tray.
- Fill the included measuring cup with distilled water to the designated fill line and dump into empty sterilizer.
- Reinsert the tray and place bottles and reservoirs separately in designated spots.
- Close top, and open top basket.
- Place nipples with the collars around them, pacifiers, and any other parts you wish to sterilize into the basket.
- Close the lid and turn on the sterilizer.
- Walk away because your job here is done.
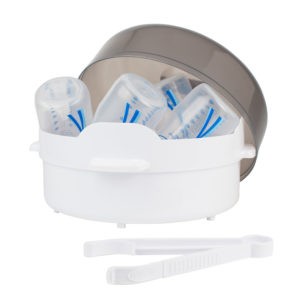
How to Use a Microwave Steam Sterilizer
If you have a microwave and not a lot of counter or cabinet space, a microwave sterilizer is the perfect solution. It takes the same effective steam technology as an electric steam sterilizer, using your microwave as the heat source.
Most microwave sterilizers fit standard size microwaves, but if your particular microwave is on the small side, you might want to double check measurements.
Here’s how the Dr. Brown’s® Microwave Steam Sterilizer works:
- Fill clean bottle with 6 oz/180 ml of clean water and pour into sterilizer.
- Load items to be sterilized.
- Close the lid, place inside microwave, and set time according to instructions.
- Let items and water cool for at least 10 minutes.
Travel-Friendly Microwave Sterilizer Steam Bags
When you’re on-the-go and so are your baby bottles, microwave sterilizer bags are your best friend. Dr. Brown’s® Microwave Steam Sterilizer Bags are big enough to fit bottles, internal parts and nipples. And it’s not a use-and-lose technology; you get 20 uses per bag. It’s so safe, it’s cleared for hospital use. Plus, it will easily fit pacifiers, too.
Here’s how to use Dr. Brown’s Microwave Sterilizer Bags:
- Fill a clean bottle with 2 oz/60 ml of clean water and pour into bag.
- Place items to be sterilized into bag.
- Seal bag tightly.
- Place bag in microwave and set time according to instructions.
- Use an oven mitt when removing bag from microwave as it will be very hot.
- Open and let cool before use.
- Use the Drain Spout to pour out excess water before removing the contents.
Watch this quick video to see how to use Dr. Brown’s Microwave Steam Sterilizer and Microwave Steam Sterilizer Bags
You may not have to worry about picking up that living room – but you may need to think about what your baby bottles can pick up. Sterilizing them in whatever way works best for you keeps bacteria at bay and gives baby a chance to build up their immunity. For questions on any Dr. Brown’s sterilizing products, reach out today!